 |
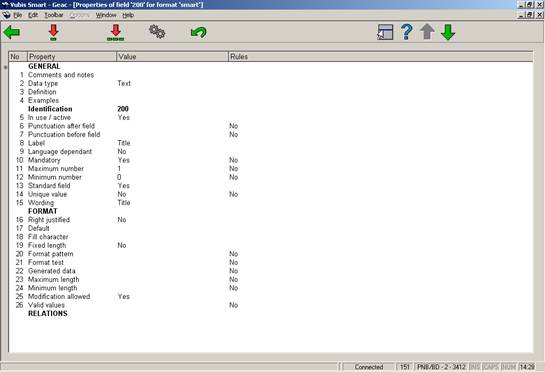
After choosing the option to display properties of a field the system shows the following screen. In the example field 200 (title) of the Smart format is chosen:

From the overview screen of a format select a field and click on the icon (or double click on a field) to display the subfields defined for that particular field:

By double clicking on a subfield you can look at the properties of that particular subfield. The properties of a subfield are similar to those of a field. Changing them is done in the same way as for fields. See section 151.2.1 for a description of the column headings on the screen displayed above.
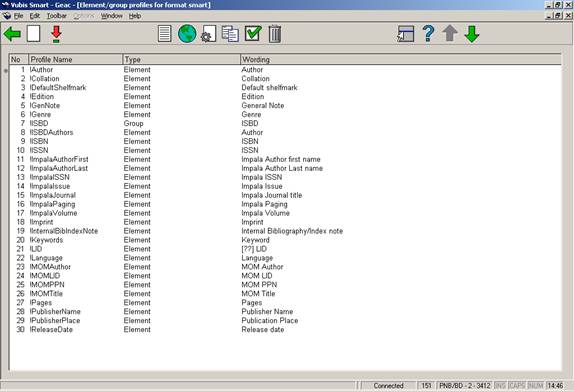
From the overview screen of a format click on the icon to display a list of defined profiles. On this screen sequence no., name, type and description of all profiles are displayed.
These profiles can be used in many areas of the system to ensure a uniform output of data. The element/group profiles are used in the SSP module, the catalogue, printing of notices etc. The idea behind these profiles is that you only need to define a profile once, which can then be used infinitely. The advantage is that you can define multiple profiles to format ‘raw’ data for use in various modules and parts of the system (see the next section for an overview). Examples are the definition of an ISBD profile or other complex presentations which can be used in SSP output. You can also use profiles to determine how titles are displayed in the system. This gives you full control over the display of bibliographic data throughout the system.
The profiles are used in the following AFO’s:
|
AFO |
Description |
|
151 & 152 |
Databases – definition of ‘Display data mapping’ elements uses element/group profiles. This definition is used to display bibliographic information on the technical overview screen of a record (Field ‘Description’) in AFO’s 111, 113, 211, 321, 421 etc. |
|
111 & 113 |
The display of bibliographic information on the technical overview screen of a record (Field ‘Description’) is derived from the definition of ‘Display data mapping’ elements in AFO 151 – Databases. The relations display uses the !Title profile in the title column. |
|
141 |
SSP can use element/group profiles as well as “raw” data for output. |
|
155 |
The system uses the !Title profile for showing locked records. |
|
271 |
When defining layouts for printing orders, claims and cancellation notices element/group profiles are used. |
|
363 |
When defining layouts for printing serials claims notices element/group profiles are used. |
|
421 & 423 |
The display of bibliographic information on the technical overview screen of a record (Field ‘Description’) is derived from the definition of ‘Display data mapping’ elements in AFO 151 – Databases. |
|
453 |
For print job summary reports element/group profiles are used. |
|
46x |
Wherever author and title are shown, the display is based on profiles !Author and !Title. |
|
WebOpac |
The relations display in the WebOpac uses standard element/group profile definitions. |
The system allows the definition of so-called “elements’, i.e. data elements that are formatted in a certain order and with specific punctuation. These elements can then be put together in so-called “groups”, which are combinations of several elements.
Data from the bibliographic (or authority) database are then linked to these elements.
Profiles can be defined for elements as well as groups. The system offers you this option within AFO 151.
Note:
The profiles are format dependant, i.e. element and group profiles can not be shared between formats.
One or more bibliographic (sub)fields can be formatted to become a so-called “element”. An element has the following general properties:
· Profile name.
· Wording (language dependant).
· Maximum number of repeats of element (0 = no maximum). When you specify a number here this is the number of times the display of the element will be repeated.
· Include first data occurrence only. This allows for the “OR” condition in an element. It is used to stop the system looking for data as soon as one occurrence is found. You can use this to create an element that selects data from tag a/subfield b; but, when this does not exist, to take the data from tag x/subfield y. If checked this rule takes precedence over ‘Maximum number of repeats of element’. The override value is 1.
· Punctuation before total presentation (only used if not zero).
· Punctuation after total presentation (only used if not zero).
· Punctuation between element occurrences (if not zero, then re-occurrences of the same element will be shown on the same line, separated by the defined punctuation).
· Respect order of subfields in record.
· Element layout definitions consist of:
- Field/subfield ID (Note: fields with subfields cannot be selected).
- Include repeating subfields (if not set only the first occurrence of a subfield in a tag will be used).
- Which languages to include.
- Punctuation before (punctuation characters to be displayed before the data of the subfield, when the subfield appears in the data).
- Punctuation before the first occurrence.
- Punctuation before the first occurrence in the presentation format.
- Punctuation after.
- Punctuation after last occurrence.
- Punctuation after last occurrence in the presentation format.
- Invert data (used to invert names with prefixes, i.e. “Geel, van” becomes “van Geel” – data before and after the comma is switched and a space put between the two bits of data).
‘Punctuation before’ normally appears before the data from a tag/subfield combination. This can however be overridden, depending on the position of the tag/subfield combination within the element data.
‘Punctuation before’ is secondary to ‘Punctuation before the first occurrence’ if the tag/subfield combination is present in the first occurence of the element.
‘Punctuation before the first occurrence’ is secondary to ‘Punctuation before the first occurrence in the presentation format’ if the tag/subfield combination is present in the first occurrence of the element and if it is the first tag/subfield combination in its total occurrence.
‘Punctuation before the first occurrence in the presentation format’ is secondary to ‘Punctuation before total presentation’ only if the value ‘Punctuation before total presentation’ is not zero and only if it is the first occurrence of the element.
‘Punctuation after’ normally appears after the data from a tag/subfield combination. This can however be overridden, depending on the position of the tag/subfield combination within the element data.
‘Punctuation after’ is secondary to ‘Punctuation after the last occurrence’ if the tag/subfield combination is present in the last occurrence of the element.
‘Punctuation after the last occurrence’ is secondary to ‘Punctuation after the last occurrence in the presentation format’ if the tag/subfield combination is present in the last occurrence of the element and if it is the last tag/subfield combination in its total occurrence.
‘Punctuation after the last occurrence in the presentation format’ is secondary to ‘Punctuation after total presentation’ only if the value ‘Punctuation after total presentation’ is not zero and only if it is the last occurrence of the element.
If the value of ‘Punctuation between multiple element occurrences’ is zero, then each occurrence of an element will be displayed on a separate line. The example below shows the result of a record with multiple authors where the value of ‘Punctuation between multiple element occurrences’ is zero:

If the value of ‘Punctuation between multiple element occurrences’ is not zero, then each occurrence of an element will be displayed on the same line separated by the specified character. The example below shows the result of a record with multiple authors where the value of ‘Punctuation between multiple element occurrences’ is “, ”:

Group profiles provide the capability of combining elements in a certain order. A group profile has the following properties:
· Profile name.
· Wording (language dependant).
· List of elements.
· value used to concatenate elements – if a value is defined, this will be used to present the elements as a whole with each element separated by the defined value (e.g. “. – “, which is used in the ISBD presentation).
Profiles of which the name starts with an exclamation mark are system profiles and cannot be deleted. The system profiles below are available for the formats Smart, UniMarc/B and Marc21/B:
· !Title (contains all titles of a record).
· !Author (contains the primary author).
· ALL bibliographic data that can be selected for defining layouts for notices from the Acquisitions (orders, claims), Serials (claims) and Circulation (reminders, reservations) modules will also be added as system profiles.
· !Reservation (contains the bibliographic data necessary for AFO 421).
· !WebReservation (contains the bibliographic data necessary for Web reservations).
· !ISBD.
· !SISO.
· !SysCO
· !UDC.
The system profiles below are available for the formats SmartAuthorities, UniMarc/A and MARC21/A:
· !Classification
· !Keyword
· !MainHeading
· !SeeAlsoReference
· !SeeReference
· !UniformTitle
The Display Data Mapping settings for each database of the Smart, UniMarc/B and MARC21/B formats will have the following default values:
Element 1 - !Author
Element 2 - !Title
Element 3 - !Edition
Element 4 - !Imprint
Element 5 - !GenNote
The Display Data Mapping settings for each database of the SmartAuthorities, UniMarc/A and MARC21/A formats will have the following default values:
Element 1 - !MainHeading
Element 2 - !Classification
Element 3 - !UniformTitle
Element 4 - !Keyword
Element 5 - !SeeReference
Standard element and group profiles will be delivered on installation or as part of an upgrade to releases > 2.1.
On the overview screen of a format click on the icon [EG]. This will result in a list of defined Element and Group profiles. For each element or group the system shows: number, profile name, type (group or element) and wording (language dependant).

When you click on the icon , the following input screen is shown in case of an element profile:

or in case of a group profile:

When you click on the icon , the following input screen is shown:

The system will prompt for the punctuation definition for each defined subfield.
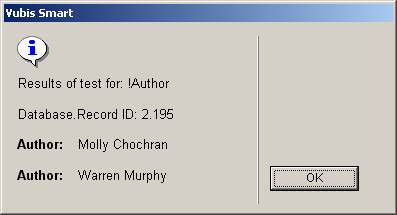
When you click on the icon : you are offered an input screen where you can specify the profile(s) you wish to test. You must also provide the ID of the bibliographic record you want to use for the test:
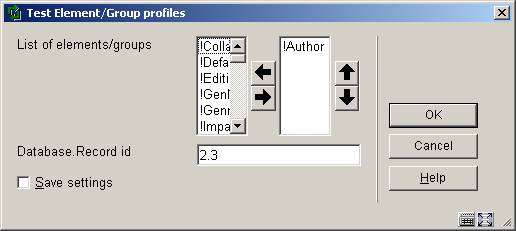
After clicking OK the system will perform the test and show the result:
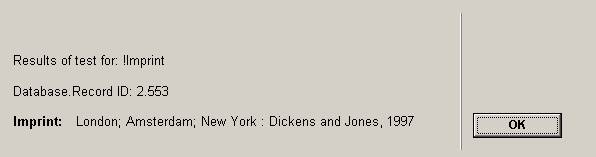
The examples in the next section use the bibliographic record shown below:
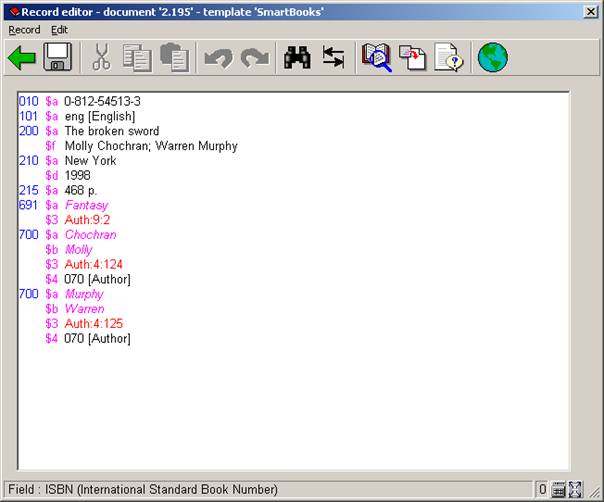
Using the standard !Author element profile in our test, we will get the following result:

The !Author element profile is defined as 700/$a with “,” punctuation before the 700/$b whereby this can have multiple occurrences.
When we change the !Author element profile to the definition 700/$b followed by “ “ (i.e. ‘Punctuation after’=” “ and ‘Punctuation after last’=” “), and then 700/$a, we will get the following result:
If we only want one author we set ‘Maximum number of repeats of element’ to 1; and we will get the following result:

If we only want to see the first subfield containing data, we tick ‘Include first data occurrence only’ and the result will be we only see data from 700/$b:

The examples in the next section use the bibliographic record shown below. The examples concentrate on tag 210.

In the table below, “B” a blank (space).
|
Example 1: Standard !Imprint element profile |
||||
|
Subf |
Punct. before tot. pres. |
Punct. before |
Punct. before first |
Punct. before first in presentation |
|
$a |
|
;B |
B |
|
|
$b |
|
B:B |
B:B |
|
|
$d |
|
,B |
,B |
|
|
Result:
The first $a is not preceded by any punctuation (Punctuation before first in presentation). Repeated $a subfields are preceded by “;” (Punctuation before). The first $c is preceded by “:” (Punctuation before first) and the $d is preceded by “,” (Punctuation before first). |
||||
|
Example 2: Add punctuation to ‘Punctuation before first in presentation’ for a new result: |
|||||
|
Subf |
Punct. before tot. pres. |
Punct. before |
Punct. before first |
Punct. before first in presentation |
|
|
$a |
|
!B |
;B |
B |
|
|
$b |
|
\B |
B:B |
B:B |
|
|
$d |
|
?B |
,B |
,B |
|
|
Result:
Because the $a is the first subfield in the presentation, the output is preceded by “! “. |
|||||
|
Example 3: Add punctuation to ‘Punctuation before total presentation’ for a new result: |
|||||
|
Subf |
Punct. before tot. pres. |
Punct. before |
Punct. before first |
Punct. before first in presentation |
|
|
$a |
<B |
!B |
;B |
B |
|
|
$b |
<B |
\B |
B:B |
B:B |
|
|
$d |
<B |
?B |
,B |
,B |
|
|
Result:
Because the ‘Punctuation before total presentation’ is not zero, the complete presentation is preceded by “<”, as defined in the element profile. This overrides the definition for ‘Punctuation before first in presentation’. |
|||||
When choosing the second option from the AFO 151 main menu – Databases – a list is shown of databases already defined. Click on the icon to create a new one. This will result in the following input screen:

The various properties of a Vubis Smart database in AFO 151:
|
Property |
Description |
|
Number |
The database identification number. Number 1 is always a system database. Therefor the first bibliographic database will always be number 2. When creating a new database a number is assigned automatically. It is not recommended to change this number (although it is possible on this screen). |
|
Name |
A short, descriptive name for the database. |
|
Directory |
The directory (called namespace within the Caché database server) where the database must be stored. U can choose a different directory/namespace from the current one, but that must be a correct Vubis Smart namespace. |
|
Format |
The bibliographic format for the database. |
|
Comments and notes |
Free text. |
|
Record counter |
This is a sequence number for the bibliographic records in the database. For a new database this will always be zero. After you start using the database and fill it with records this counter will be incremented. It is possible to amend that counter here. Warning: never amend this counter for a database in use without consulting Geac staff first. |
|
In use |
As long as this property has not been set, the database cannot be used. Later you can disable an existing database in this way, without having to physically remove it. |
|
Number of copies to store |
You can retain previous versions of edited bibliographic records. The number of version you wish to retain is specified here. |
|
Include archive file |
When a bibliographic record is deleted and this parameter is set to Yes, then the last version of that record will be stored in the archive file. |
|
Include Opac commencing date property |
This property is meant to specify that a new record may only appear in the Opac after a certain date. This can be useful for Community Information databases. |
|
Include Opac expiry date property |
This is the opposite of “Include Opac commencing date property “. With this property you can specify that a new record may no longer appear in the Opac after a certain date This can also be useful for Community Information databases. |
|
Include expiry date property |
This is similar to the “Include Opac expiry date property”. With this property you can specify that a new record must be deleted from the database after a certain date. This goes one step further than “no longer visible”. This can also be useful for Community Information databases. |
|
Administrative info allowed |
Determines whether data such as shelfmarks, orders, subscriptions can be added to bibliographic records. This is important for background databases, where this parameter must be set to No. |
|
New record creation allowed |
Whether or not creation of new records is allowed. |
|
Changes to records allowed |
Whether or not editing of records is allowed. |
After you have set the above properties on the input screen you have to call up the database definition again by selecting the database and clicking on the icon . Now you can set two more properties.
|
Storage data mapping |
With these details a corresponding record will be created in ^BB for each new or edited bibliographic record to link to old functionality. Only language and title can be specified, because those are the only mandatory fields in ^BB. |
|
Display data mapping |
Determines the content of the brief bibliographic information as displayed on the technical overview screen. For each of the five elements you can define a element/group profile to be displayed. See also the section on element/group profiles for more information. |
The bibliographic database cannot be searched without indexes. Data is stored in an index to enable quick access to a bibliographic record which contains this data.
For the definition of indexes so-called mechanism sets are used. There are predefined mechanism sets installed on the system. It is not recommended to create your own without consulting Geac staff.
A mechanism set is a set of indexing rules that can be applied to certain fields. The mechanism set for word looks like this:
1. Collect fields and or subfields.
2. Replace punctuation with spaces.
3. Remove leading, trailing and double blanks.
4. Determine individual words
5. Transform diacritics to non-diacritics in uppercase.
6. Transform to uppercase.
7. Remove words defined in stopword lists.
8. Determine display form of index term.
9. Create automatic references for filing terms.
Vubis Smart knows various standard mechanism sets. You can use these to define your own indexes.
In AFO 151 -> Indexes -> Indexes, click on the icon . This will bring up an input screen where you can define the new index:
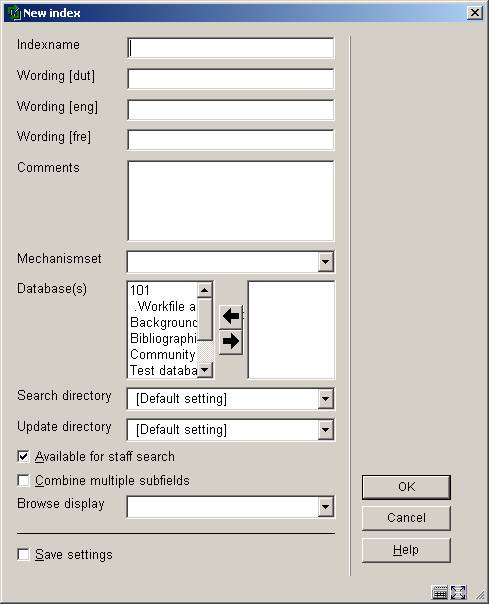
Give the index a name and a description and optionally put in comments. Choose a mechanism set and the database for which the index is. Make sure the correct namespace is set. Determine whether or not this index is available for staff searches (i.e. from the standard search tab in AFO 111, 211, 321, 421 etc.). Finally you can use “Browse display” to choose an element/group profile to be used for presentation of the result list. This can be useful for .e.g. classification indexes. Click .
Note:
When you create a new index this is not automatically filled with data. This only happens when you create or import new bibliographic records or edit & save existing records in AFO 111. Alternatively you can re-index existing records through AFO 157.
Indexes are available in the Vubis Smart client if the parameter “Available for staff search” is set. For the WebOPAC you determine separately which indexes will be available (through the WebOPAC preferences). This enables you to offer different indexes for staff and public.
Stopwords are words that are not indexed. These words are also ignored when entered as part of a search string.
Stopword definitions are language dependant, because what may be a noun in one language (English: “ten”) can be a preposition in another language (Dutch: “ten”).
Note
The option “No sorting” is no longer functional.
This section contains definitions of the restrictions that can be used to qualify searches. There are 11 restriction indexes, you cannoot add new ones or delete existing ones. But you can cahnge the wording and mark them as in use / inactive.
Partial indexes allow Vubis Smart to present search results based on material type and location where the user is at. To achieve this the system tracks in which partial index a title belongs based on material type and/or location.
An example. Your library has youth and adult departments (in part based on material type) and you want to offer these as separate catalogues to the public.
· - The library consists of institution BIB and locations A, B and C
· - The material types can be distinguished by elements of their codes. E.g. YNF (youth non-fiction), ANF (adult (non-fiction), YF (youth fiction), AF (adult fiction).
Configuration
First you have to configure the partial indexes. Add a new definition, using a short code (e.g. CENY, CENA, TOTA, etc.). Link this to the database for which the index is meant. After saving the details you are taken back to the overview screen. Select the newly defined code for further configuration.
You can now make a combination between material types and locations. A few examples of possible partial indexes:
· A partial index for the total collection of location A:
- - Define location as BIB/A
- - Define material type *
· A youth catalogue for location B:
- - Define location as BIB/B
- - Define as material type all types that belong to the youth department
· An adault catalogue for all locations:
- - Define location as BIB/*
- - Define as material type all types that belong to the adult department.
Define all required partial indexes. For the “complete” catalogue you do not have to define a partial index, instead you offer a profile or search option without using partial indexes.
Please note it is useful to have a proper distinction between material types for youth and adult works, when you want to create separate youth and adult “catalogues”.
Building partial indexes
To activate the defined partial indexes, there are a number of steps. For each bibliographic and authority record it must be determined in which partial index they belong. This requires a complete indexation of the system, for which you must check the option “Rebuild partial index information before indexing?”. In that case the system will check for each bibliographic and authority record in which partial index(es) they belong. This information is saved for each bibliographic and authority record, for the indexes that wil be build after this step.
Re-indexation
A separate index for partial indexes must be defined. This definition is similar to that for a restriction index, choose the restriction partial indexes for this index.. You should not define any subfields for this index.
Since the partial index information is defined as (one) separate index, it is only necessary to re-index this particular index. Note you can only do this once a partial index has already been built previously. When this has not yet been done (i.e. this is your first partial index), you will have to do a complete re-indexation. The new index for partial index information must have been defined prior to this.
Once partial indexes have been defined, this information is stored for each new (imported or manually added) bibliographic and authority record. Therefor in theory it is not necessary to rebuild the partial index information, building the special index once should be sufficient.
It is possible to let the user sort the search results in the WebOpac, using hyperlinks above the columns. For this it is necessary to have thre required sort indexes. You can not define your own sort indexes. But you can specify which profile must be used for each sort index.
It is also important to use the option on this screen, after you have made the relevant definitions in the WebPreferences.
Relations deals with the link that can be made between various records in the same database.

In this diagram you see three layers: the series, the parts and sub parts. A bibliographic record can be of a series title, which has relations to the records of the individual parts of the series. These records of the individual parts have a reciprocal relation to the main series record. On the other hand the individual parts can also link to sub parts like the individual tracks on a CD etc. These are also reciprocal.
The relationships are denoted by arrows in the diagram. It is important to note that a relationship between records can be made from a low level to a higher level or vice versa - the choice is yours. Note also that the reciprocal relation is created automatically by the system.
Vubis Smart has a list of relation types. You can look up this list through AFO 151 -> Relations. You can add new types if necessary.

Double click on a type to bring up the input screen for editing the details of a relation:

· Document control - Change History
|
Version |
Date |
Change description |
Author |
|
1.0 |
unknown |
creation |
|
|
2.0 |
November 2006 |
added information on partial indexes, sorting, stopwords, restrictions (delivered as part of release 2.4.2 build 1 updates) |
|